Photoshop
every image has a mode, to see this go to image- mode...
you can set the colour mode on a new photoshop document
if you take an image from a digital camera the colour mode is RGB
scanning is also RGB
(the colour mode you need for print is CMYK)
the default mode on photoshop is RGB
some of the options in filter become unavailable when the colour mode is CMYK
many RGB colours sit outside the CMYK colour gamut (range)
so colour from RGB mode will shift when changed to CMYK
view- gamut warning
(will show you any colours outside of the CMYK range)
shows in grey

you can adjust the hue and saturation
or the levels
or brightness and contrast
Or just change the mode to CMYK- but you aren'y entirely in control of the colours, adjusting it yourself you can make selections


view- proof colours
image made changes to ...
so you are still working in RGB but it shows you it as if it was CMYK

ensuring your adjustments don't go out of the colour gamut
this is a recommend work flow, and the last thing you do when its finished is convert the mode to just CMYK
swatches
to delete swatches in photoshop you have to do it individually , by holding the alt key and clicking
It is possible to save swatch palettes
reset swatches brings back the default swatch palette
replace swatches will load up your swatch palette
to apply a colour go to foreground/ background, and use the colour picker
foreground colour is the active colour
the square with the triangle and exclamation mark within it is a warning that that colour is out of the CMYK gamut
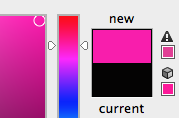
click on the warning to get the closest CMYK colour
once you have chosen your colour you can 'add to swatches'
spot colours
color libraries are the pantone referencing books


The colour applied to the CMYK image will change to CMYK , and so it won't be a spot colour ( different ink )
and so there are specific ways to work with spot colours in photoshop
in order for spot colour to be printed there has to be a reference to its unique number code/ name
grayscale- only printed with black ink
if you want to use a spot colour the image firstly has to be grayscale
then in the colour mode menu , select duotone
duotone curve , allows you to map the ink to the gray areas of the original image
Monotone
(1 colour)


Duotone
(2 colours)


Duotone curve


You can always tweak the duotone curve, it isn't final, its editable all the way through
(Three tones)

save the duotone as a photoshop file
channels

are always shown as grayscale images
the channels give us an insight into the print process (CMYK)
almost as if the each of the channels is an ink
this method works for grayscale images and CMYK

make sure the pantone reference number is there or else it can't be referenced


(and white removes the colour)
x to switch between background and foreground colour
switching to a grey shade will let you work with a tint of that colour
to spot varnish you would use a spot colour you that you weren't using and specify to the printer that this is where you would like your spot varnish
solidity, the transparency of the ink,


when saving make sure the spot colours box is still checked.
if you try save as JPEG you can't choose a spot colour

No comments:
Post a Comment