Adobe Dreamweaver (previously owned by macromedia)
Creating a website on Dreamweaver ...
Firstly do not re-open files from recent files ( In college especially as it is a shared network)
And try not to use shortcuts
Work with HTML or CSS
Go to new and chose HTML firstly ...
The first thing you can see is there are three choices of screen

As the programme is WYSIWYG the design view should look exactly how it will look on the web.
On the code view this is what appears ...
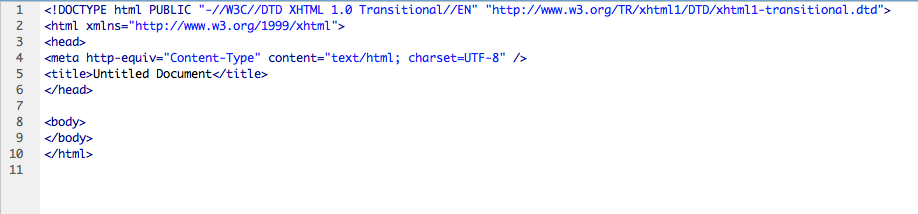
Which equates to a blank page on the web

The first line of coding is just saying what the document is and it isn't really necessary, and the second line can be simplified to <html>
As below

This is the simplest form of coding, although it is best to leave all of it as it is but for the purpose of this induction we eliminated unnecessary information.

HTML Tags
Line 1 is a open HTML tag, it is basically telling the site/software that we are using that to code and we are starting our process. This way the server/ and the web knows the language we are using , if this wasn't there the page on the web would be blank.
A html tage with a slash, or any word with a slash at the front is a closing bracket.
<html> open/beginning
</html> closed/ending
<head> is an important tag and anything to do with the function of the website goes into this tag. So if we want to use CSS this is needed.
<meta> tag , you can put keywords in here to increase SEO
<title> also for SEO , and the title/ name of your site. (Which appears in the new tab/ tab bar on the internet tool bar, also with a favicon (small icon))
<body> anything between this is for the design/ to be seen
end everything with </html>
Root Folder
Anything inside/on the site is contained in this folder (like Package on InDesign)
naming conventions (for the folders)- no capitals and no spaces
images- a subfolder in the root folder, this must contain any media going onto the site a web server will look for this folder and knows what if it is called images.
You could also have a mockups folder in the root folder but this will not go online but save your initial plans with your site.
Tell DreamWeaver where the folder is by going to options ...
'new site' if you have just made it
'manage site' if you are working on a site you have previously worked on (or if you are on a different computer)
Site Name - can be anything, it is the name of your site.
Local Site Folder- the Root Folder
Web Servers
To add a web server, use the + icon , add new server
You can call your server anything
Connect using FTP (sometimes this is IP (a series of numbers))
Add the FTP address
You don't need to tell DreamWeaver where to save as as its already been told.
never delete .html (file extension)
As it is global you can't call it anything in a specific language so it must be called
index
lowercase, and no spaces (try not to use more than eight characters)(shorten the word)


You can preview your site in a web browser (after you have saved the index)
You can do this by selecting the preview/debug in browser icon (globe)
If the browser you want doesn't appear in the options go to edit and add new browser.
It is a good idea to preview this after every change made and you will be able to spot where something has gone wrong and you will know why.

You can change the title in the code view
Or in the title bar just above

the * indicates a change has been made, but it hasn't been saved.
Once you have made a change save it , and refresh your preview in the browser, to see the changes and how they look.

e.g. <title>amy hill</title>
The name has changed in the tab bar...

Hello ! (this hasn't been formatted and has been standardised to the font times new roman)


Creating a CSS Document
If you use HTML you have to code the style for every sheet/ webpage
It is best to work with CSS externally (as a new option)


CSS doesn't work with open/ closed brackets

body {


Semi-colon closes the variable
} closes the option


Save this as a stylesheet in the root folder

Back on the HTML file attach the stylesheet by going to the small link button in the options bar on the right...


Find the stylesheet file in the root folder and attach

This should be attached in the head tag as it is a function

And finally to save it all , go to file save all as it is a multi file document

No comments:
Post a Comment